The Ultimate Guide to Vape Coil Maintenance for Beginners
If you’re new to vaping, you might be wondering why your vape sometimes tastes burnt or why your clouds aren’t as impressive as they used to be. The answer often lies in your vape coil—a small but crucial component of your device. Proper vape coil maintenance UK can make all the difference in your vaping experience, saving you money and ensuring consistent flavour and vapour production. At Vapes Venture, we’re here to walk you through everything you need to know about how to care for vape coils in 2025. From cleaning and replacing to choosing the right coil for your device, this beginner’s guide has you covered—plus, we’ll recommend some top coils and accessories from our inventory to get you started.
What Is a Vape Coil and Why Does It Matter?
A vape coil is the heating element inside your vape tank or pod that turns e-liquid into vapour. It’s typically made of a metal wire (like kanthal, stainless steel, or nickel) wrapped around a wicking material (usually cotton) that absorbs the e-liquid. When you press the fire button, the coil heats up, vaporizing the e-liquid so you can inhale it. Over time, coils degrade due to heat, e-liquid residue, and general wear, leading to burnt tastes, muted flavours, or weak vapour production. Proper maintenance extends the life of your coil, improves your vaping experience, and saves you from frequent replacements.
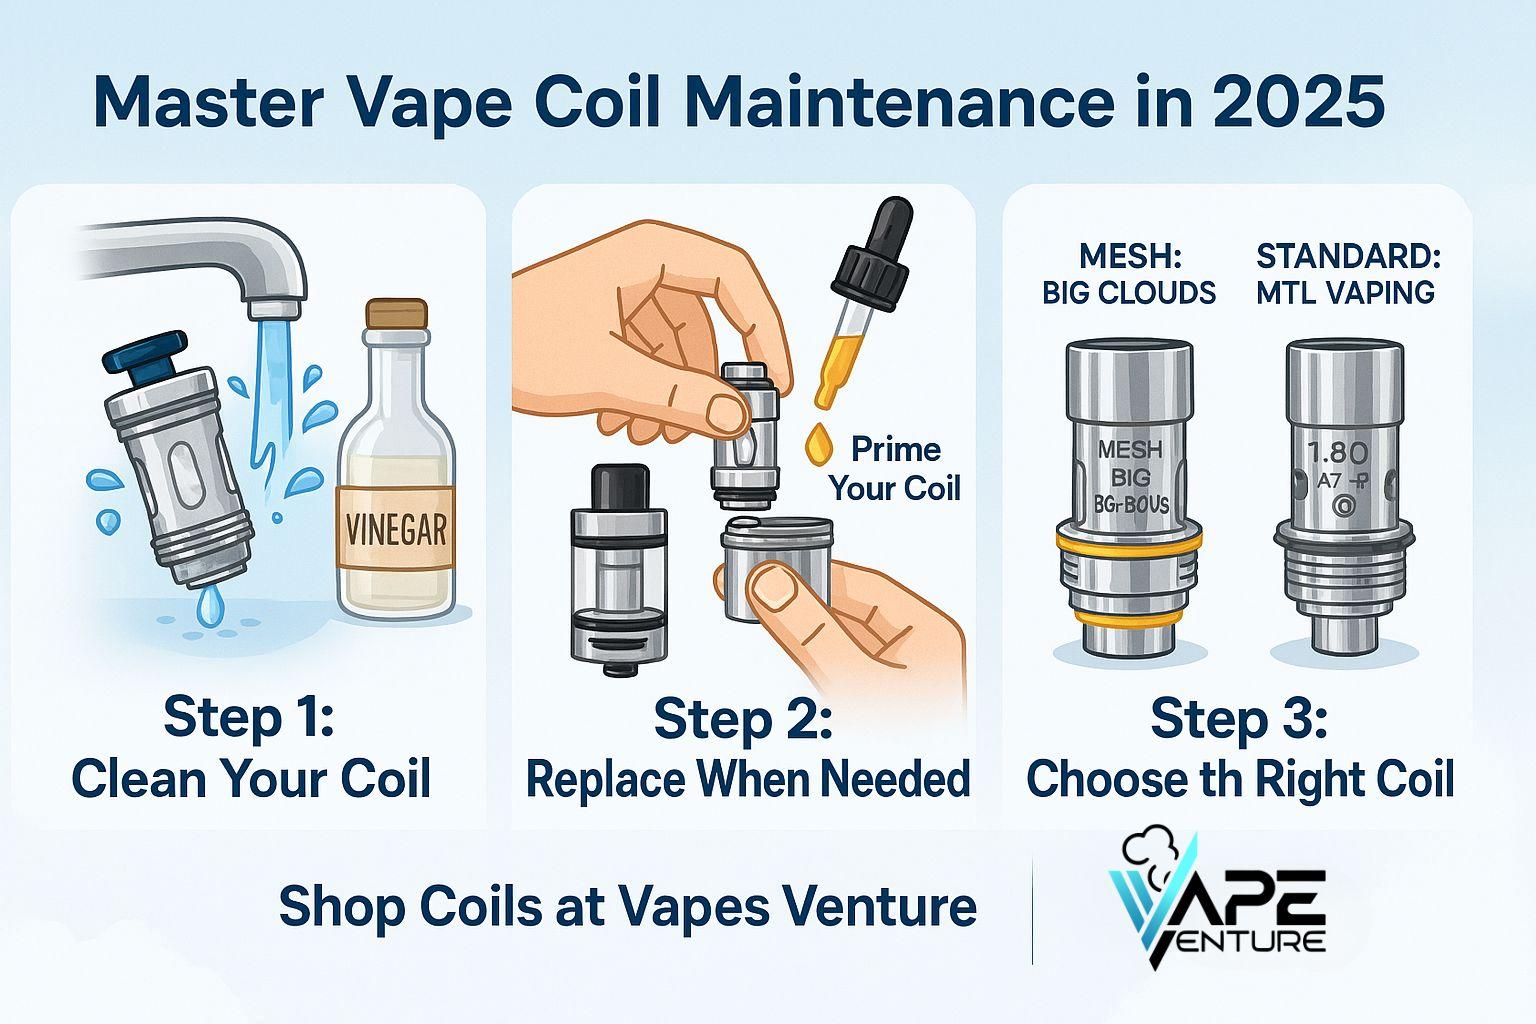
Step 1: How to Clean Your Vape Coil
While most coils are designed to be replaced rather than reused indefinitely, cleaning can help extend their lifespan between replacements—especially if you’re using a rebuildable coil or notice early signs of gunk buildup. Here’s how to clean your vape coil safely:
- Remove the Coil: Detach the coil from your tank or pod system. Be careful not to damage the wicking material or the coil itself.
- Rinse with Warm Water: Run the coil under warm (not hot) water for a few minutes to remove e-liquid residue and debris. If the gunk is stubborn, soak the coil in warm water for 10–15 minutes.
- Use a Cleaning Agent (Optional): For deeper cleaning, soak the coil in a small bowl of vodka, white vinegar, or a 1:1 mixture of water and lemon juice for 30 minutes. These agents can break down sticky residue without damaging the coil.
- Rinse Again: Thoroughly rinse the coil with warm water to remove any cleaning agent residue.
- Dry Completely: Let the coil air-dry for at least 24 hours, or use a hairdryer on a low setting to speed up the process. Ensure it’s completely dry before reinstalling to avoid short-circuiting your device.
- Prime the Coil: After reinstalling, apply a few drops of e-liquid to the wicking material to prime the coil before vaping. This prevents dry hits and ensures proper saturation.
Note: Cleaning works best for rebuildable coils or when buildup is minimal. If your coil is too burnt or damaged, it’s time to replace it. We’ll cover that next.
Step 2: When and How to Replace Your Vape Coil
No matter how well you maintain your coil, it will eventually need replacing. Here’s how to know when it’s time and how to do it:
- Signs It’s Time to Replace:
- Burnt taste, even after cleaning.
- Reduced flavour or vapour production.
- Leaking or gurgling sounds from your tank.
- Dark or discoloured wicking material (visible through the coil’s openings).
- It’s been 1–3 weeks of regular use (coil lifespan varies based on usage and e-liquid type).
- How to Replace Your Coil:
- Turn off your device and empty the tank of any e-liquid to avoid spills.
- Unscrew the tank’s base (or follow your device’s instructions) to access the coil.
- Remove the old coil and dispose of it responsibly at an e-waste recycling point.
- Take your new coil, prime it by adding a few drops of e-liquid to the wicking holes, and let it sit in the tank with e-liquid for 5–10 minutes.
- Reassemble the tank, fill it with e-liquid, and start vaping at a low wattage to break in the coil.
Product Recommendation: At Vapes Venture, we stock a wide range of replacement coils for various devices. For example, the Vaporesso GTX Coils are perfect for beginners, offering excellent flavour and a lifespan of 1–2 weeks with proper care. Shop Vaporesso GTX Coils at Vapes Venture.
Step 3: Choosing the Right Coil for Your Device
Selecting the right coil can be overwhelming for beginners, but it’s crucial for a satisfying vape. Here’s what to consider when choosing between mesh and standard coils, along with some options from our inventory:
- Mesh Coils vs. Standard Coils:
- Mesh Coils: These have a larger surface area, providing better flavour, bigger clouds, and a longer lifespan. They’re ideal for sub-ohm vaping and high-VG e-liquids. However, they can be more expensive and may consume e-liquid faster.
- Standard Coils: These use a single wire (e.g., kanthal or stainless steel) and are better for MTL (mouth-to-lung) vaping with high-nicotine or nic salt e-liquids. They’re cheaper but may not deliver the same flavour intensity or cloud production as mesh coils.
- Resistance (Ohms): Lower resistance (e.g., 0.2–0.6 ohms) is better for sub-ohm vaping (DL, direct-to-lung), producing more vapour but requiring more power. Higher resistance (e.g., 0.8–1.2 ohms) suits MTL vaping, using less power and e-liquid.
- Compatibility: Always check that the coil is compatible with your device. For example, if you’re using a Vaporesso device, stick with Vaporesso coils unless your device supports cross-compatibility.
Product Recommendations: At Vapes Venture, we carry coils for all types of vapers. For mesh coil lovers, try the GeekVape Z Series Mesh Coils, perfect for sub-ohm vaping with rich flavour and dense clouds. For MTL vapers, the Aspire BVC Coils offer a reliable, affordable option. Explore our full range of coils at Vapes Venture.
Tips to Extend Your Vape Coil’s Lifespan
Proper care can significantly extend the life of your vape coil, saving you money and ensuring a better vaping experience. Here are some beginner-friendly tips:
- Prime Your Coil Properly: Always prime a new coil by adding e-liquid to the wicking material and letting it sit for 5–10 minutes before vaping. This prevents dry hits that can burn out the coil prematurely.
- Use the Right Wattage: Check the recommended wattage range on your coil (usually printed on the side). Vaping at too high a wattage can burn the coil, while too low a wattage can cause flooding.
- Avoid Sweet E-Liquids: High-sugar e-liquids (like dessert or candy flavours) can gunk up your coil faster. If you love sweet flavours, clean your coil more frequently or switch to a less sugary e-liquid occasionally.
- Keep Your Tank Full: Don’t let your e-liquid run too low—vaping with a nearly empty tank increases the risk of dry hits, which can damage the coil.
- Store Properly: When not in use, store your device in a cool, dry place to prevent e-liquid from degrading and clogging the coil.
Product Recommendation: To keep your tank clean and functioning well, pair your coil with a high-quality tank like the Vaporesso iTank 2, which offers easy coil installation and excellent airflow for optimal performance. Shop Vaporesso iTank 2 at Vapes Venture.
The Environmental Impact of Vape Coils
Vape coils are small, but they can add up in terms of environmental impact if not disposed of properly. In the UK, 8.2 million vapes are discarded weekly, and coils contribute to this waste due to their metal and cotton components. To vape more sustainably, always dispose of used coils at e-waste recycling points—don’t throw them in the bin. At Vapes Venture, we’re committed to helping you vape responsibly while enjoying the best performance from your device.
Ready to Master Vape Coil Maintenance?
Mastering vape coil maintenance UK doesn’t have to be complicated. By cleaning, replacing, and choosing the right coils for your device, you can enjoy a better vaping experience in 2025 while saving money and reducing waste. At Vapes Venture, we’ve got everything you need to keep your vape in top shape, from replacement coils to tanks and accessories. Ready to get started? Visit Vapes Venture’s coil section to explore our full range of products and elevate your vaping game today!
Frequently Asked Questions About Vape Coil Maintenance
Still have questions about vape coil maintenance UK in 2025? We’ve got answers to help you get the most out of your vaping experience:
You can clean your vape coil every 3–5 days if you notice a slight drop in flavour or minor gunk buildup. However, cleaning is most effective for rebuildable coils. If you’re using a pre-made coil and it’s heavily burnt or over a week old, it’s better to replace it. Regular cleaning can extend the life of your coil, especially if you’re using high-sugar e-liquids that cause faster buildup.
Warm water is usually enough to clean most vape coils, as it removes e-liquid residue effectively. For tougher gunk, you can use a mild cleaning agent like vodka, white vinegar, or a water-lemon juice mix. Avoid harsh chemicals like bleach, as they can damage the coil or leave harmful residues. Always rinse thoroughly and let the coil dry completely before using it again.
Check your device’s manual or product description to see which coils it supports. For example, if you’re using a Vaporesso device, you’ll need Vaporesso coils like the Vaporesso GTX Coils. At Vapes Venture, we list compatible devices for each coil in our inventory, so you can find the right match easily. Explore our coil selection at Vapes Venture to find the perfect fit for your device.
Mesh coils have a larger surface area, delivering better flavour and bigger clouds, making them ideal for sub-ohm (DL) vaping with high-VG e-liquids. Standard coils are better for MTL vaping with high-nicotine or nic salt e-liquids, offering a tighter draw and lower e-liquid consumption. If you’re a beginner who wants simplicity and MTL vaping, start with standard coils like the Aspire BVC Coils. For cloud chasers, try mesh coils like the GeekVape Z Series Mesh Coils. Shop both at Vapes Venture.
A burnt taste after replacing your coil usually means it wasn’t primed properly. Always prime a new coil by adding a few drops of e-liquid to the wicking holes and letting it sit in the tank for 5–10 minutes before vaping. Also, start at a low wattage to break in the coil. If the problem persists, check that you’re using the recommended wattage for your coil and that your e-liquid isn’t too sweet, as high-sugar e-liquids can burn out coils faster.
Used vape coils contain metal and cotton, so they shouldn’t be thrown in the bin. Dispose of them at e-waste recycling points to minimize environmental impact. In the UK, 8.2 million vapes are discarded weekly, and proper disposal helps reduce this waste. At Vapes Venture, we encourage sustainable vaping practices—check your local recycling options to dispose of coils responsibly.
You can find a wide range of replacement coils at Vapes Venture! We stock beginner-friendly options like the Vaporesso GTX Coils and Aspire BVC Coils, as well as mesh coils like the GeekVape Z Series Mesh Coils for cloud chasers. Visit Vapes Venture’s coil section for fast UK delivery and top-quality products.
Latest Posts